Glassmorphism login form UI Design using HTML & CSS

Glassmorphism login form UI Design using HTML & CSS

Glassmorphism login form UI Design using HTML & CSS

From this article, you will learn how to create a Glassmorphism login form with the help of HTML and CSS programming code. Glassmorphism is a modern design that is currently used to create a variety of web elements on a large number of websites. 

This type of design is much more attractive than the general design and they are much easier to make. These designs are somewhat like transparent designs i.e. in this case also the background can be seen completely transparently. But these designs are more beautiful than transparent designs

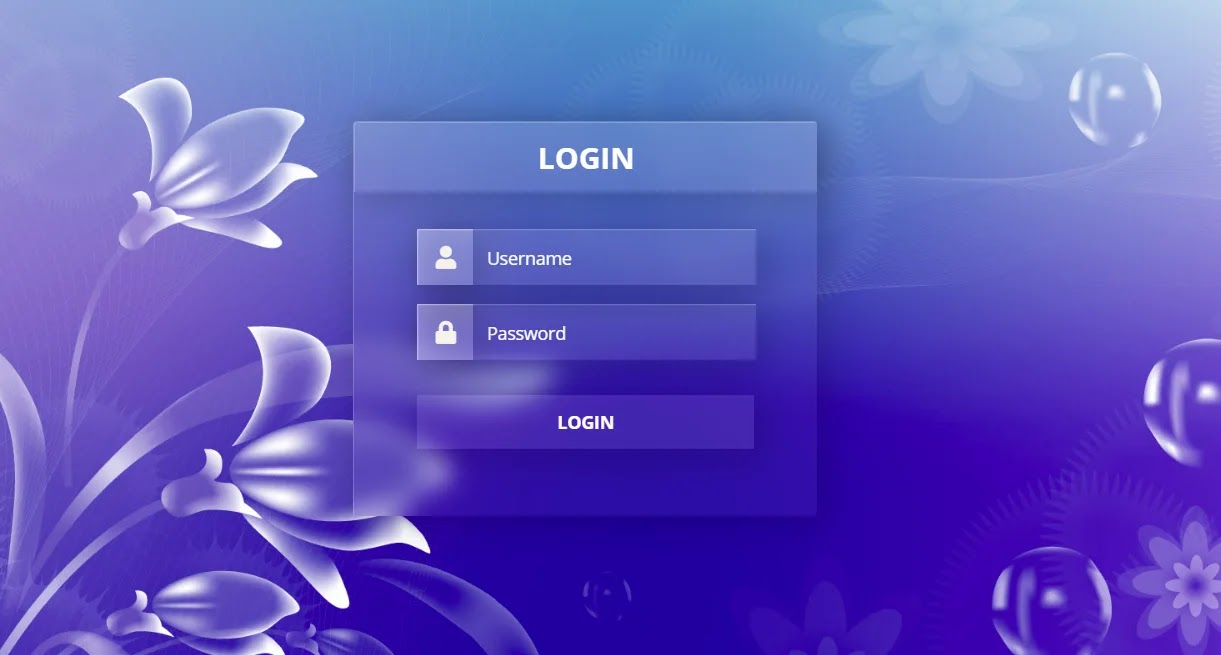
This is a very simple and simple Glassmorphism design login form. It contains everything that is in the normal login form. A place to input email id and password to log in and login button below. You can definitely use the design of any of your websites or projects. 

See the Pen
Glassmorphism login form
by shantanu jana (@fghty)
on CodePen.

If you are a beginner and want to know which programming code has been used to create an element, you can follow the tutorial below. Here I have shown step by step how I created the login form of this Glassmorphism design.

Step 1: Create the basic structure of this login form

Create the first HTML file to create this design. Then copy and paste the HTML structure below into that file. The structure below provides complete information on where you will add any code. Follow the tutorial below accordingly and create this design by adding the required code.

<!DOCTYPE html>
<html lang=”en”>
<head>  
<!–cdn icon link–>
  <link rel=”stylesheet” href=”https://cdnjs.cloudflare.com/ajax/libs/font-awesome/5.15.3/css/all.min.css”>
  <style>
    /* CSS Code */
 </style>
</head>
<body>
  <div class=”login”>
    <h1>Login</h1>
    <!–login Information–>
  </div>  
</body>
</html>

Step 2: Design the background and add the image

I have designed the background of this login form using the following codes i.e. I have used the background image.

  body {
  font: 13px/20px “Open Sans”, Tahoma, Verdana, sans-serif;
  color: #a7a599;
  background-image: url(https://i.pinimg.com/originals/23/c3/dc/23c3dcab256e90153c4d03ea769ff571.jpg);
  background-size: cover;
  background-repeat: no-repeat;
  height: 400px;
}

Step 3: Convert background to Glassmorphism design

With the help of the following programming codes, I have determined the height and length of this login form. We have also converted the background of the login form to the Glassmorphism design.

.login {
  position: relative;
  margin: 100px auto;
  width: 370px;
  height: 315px;
 background: rgba(255,255,255,0.05);
    backdrop-filter: blur(10px);
    border-top: 1px solid rgba(255,255,255,0.2);
    border-left: 1px solid rgba(255,255,255,0.2);
    box-shadow: 5px 5px 30px rgba(0,0,0,0.2);
  border-radius: 3px;
}

Step 4: Design the login title

First of all, I used a header line in the login form. I have used the following HTML and CSS programming code to create and design this line. In this case, the background of that header line has been made a little more opaque so that it can be understood separately from the complete login form.

.login h1 {
  line-height: 55px;
  font-size: 24px;
  font-weight: bold;
  font-family: “Open Sans”, sans-serif;
  text-transform: uppercase;
  color: #fff;
  text-align: center;
  background: rgba(255,255,255,0.05);
    backdrop-filter: blur(10px);
    border-top: 1px solid rgba(255,255,255,0.2);
    border-left: 1px solid rgba(255,255,255,0.2);
    box-shadow: 5px 5px 30px rgba(0,0,0,0.2);
    margin-top: 0px;
  border-top-left-radius: 3px;
  border-top-right-radius: 3px;
}

Step 5: Create a place to input emails and passwords

Using the following HTML codes, I have created a place to input the email ID and password contained in this login form. I have added an icon for each case.

<form class=”form” method=”post” action=”#”>
      <p class=”field”>
        <input type=”text” name=”login” placeholder=”Username” required/>
        <i class=”fa fa-user”></i>
      </p>
      <p class=”field”>
        <input type=”password” name=”password” placeholder=”Password” required/>
        <i class=”fa fa-lock”></i>
      </p>
      <!–login button–>
    </form>

Step 6: Design a place to input emails and passwords

I have used the following codes to design the place to input the email ID and password.

.form {
  width: 100%;
}
.form .field {
  position: relative;
  margin: 0 50px;
}
::-webkit-input-placeholder {
  color: #ffffff;
  font-family: “Open Sans”;
}
.form input[type=text], input[type=password] {
  font-family: “Open Sans”, Calibri, Arial, sans-serif;
  font-size: 14px;
  font-weight: 400;
  padding: 10px 15px 10px 55px;
  position: relative;
  width: 200px;
  height: 24px;
  border: none;
  background: rgba(255,255,255,0.05);
    backdrop-filter: blur(10px);
    border-top: 1px solid rgba(255,255,255,0.2);
    border-left: 1px solid rgba(255,255,255,0.2);
    box-shadow: 5px 5px 30px rgba(0,0,0,0.2);
  color: rgb(255, 255, 255);
  transition: color 0.3s ease-out;
}
.form input[type=text] {
  margin-bottom: 15px;
}
.form .field i {
  font-size: 18px;
  left: 0px;
  top: 0px;
  position: absolute;
  height: 44px;
  width: 44px;
  color: #f7f3eb;
  background: rgba(255,255,255,0.05);
    backdrop-filter: blur(10px);
    border-top: 1px solid rgba(255,255,255,0.2);
    border-left: 1px solid rgba(255,255,255,0.2);
    box-shadow: 5px 5px 30px rgba(0,0,0,0.2);
  text-align: center;
  line-height: 44px;
  transition: all 0.3s ease-out;
  pointer-events: none;
}

Step 7: Create the login button

The lowest option in this design is the login button. I have designed the login button in this login form using the following HTML and CSS codes.

<p class=”submit”><input type=”submit” name=”sent” value=”Login”></p>
.form input[type=submit] {
  margin-top: 15px;
  width: 270px;
  text-align: center;
  font-size: 14px;
  font-family: “Open Sans”, sans-serif;
  font-weight: bold;
  padding: 12px 0;
  color: #fff;
  background: rgba(255,255,255,0.05);
    backdrop-filter: blur(10px);
    border-top: 1px solid rgba(255,255,255,0.2);
    border-left: 1px solid rgba(255,255,255,0.2);
    box-shadow: 5px 5px 30px rgba(0,0,0,0.2);
  text-transform: uppercase;
  border: none;
  margin-bottom: 20px;
}

Hopefully from this tutorial, you have learned how to create a simple Glassmorphism login form