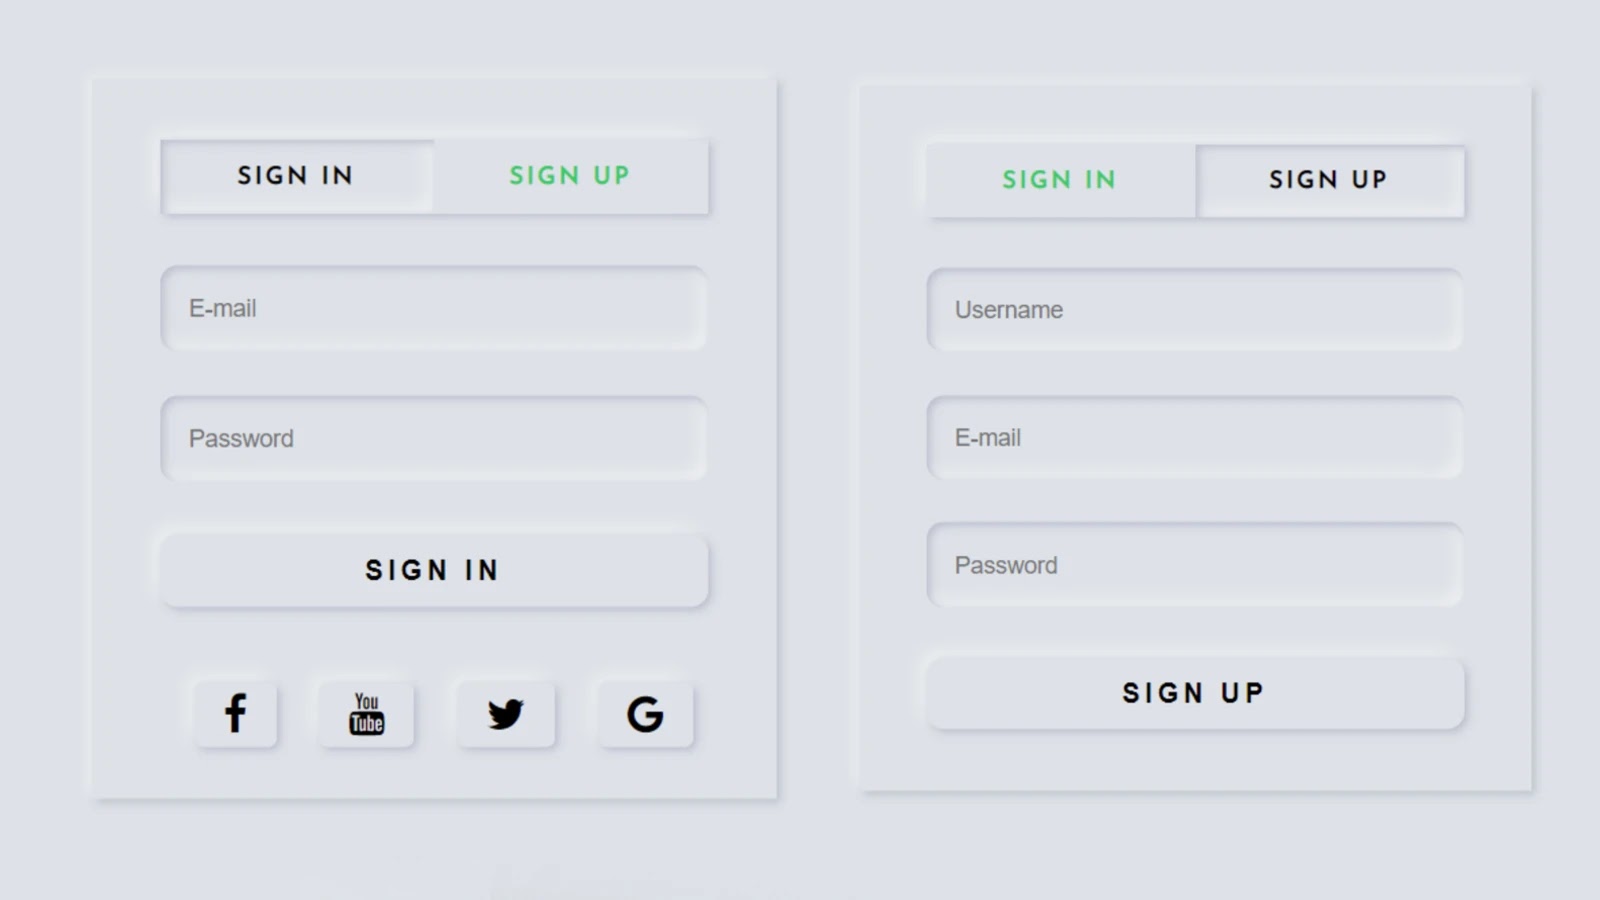

In this article, I am going to show you how to create a simple login and registration form of Neumorphism design using HTML, CSS, and Jquery code. Earlier I shared with you the design of many more types of login forms. Hope you like this design login form like other designs.
Basically different forms are created for login and registration on different websites. In the meantime, I have shown you how to create a separate login and registration form. In this article, I have created a place for simple log in and registration in a form.
This form allows the user to log in and creates a new account. I used HTML and CSS programming code to design to enhance its structure. A small amount of JQuery programming code is used here to execute the login and registration button above.
I have added social media icon in the login form. This login form is arranged in the form of a Neumorphism design.
Simple Login and Registration Form HTML CSS
If you want to know how it works, you can watch the demo below. You can copy the source code needed to create it from the demo site below and use it for your work.
But if you are a beginner and want to know how to create a login and registration form at the same time, you must follow the tutorial below. In the tutorial below I have shown step by step how I made this design. After each step, I have shown the result so it will be useful for you to understand.
See the Pen
login & sign by Foolish Developer (@fghty)
on CodePen.
First, you create an HTML and CSS file. Then combine the HTML file and the CSS file with each other. You add the JQuery plugin here.
How to create login and registration form
Basically, we know that the JQuery programming code works with the JQuery plugin. So you must add the following JQuery plugin in the head section of your HTML file.
<script src=”https://code.jquery.com/jquery-3.6.0.js”></script>
<link rel=”stylesheet” href=”https://cdnjs.cloudflare.com/ajax/libs/font-awesome/4.7.0/css/font-awesome.min.css”>
Step 1: Create the basic structure of this login form
The HTML programming code below is basically the basic structure for creating this registration form. You can copy this structure and add it to your HTML file.
<div class="wrapper">

   <div class="container">
            <!--tabs(menu)-->

   </div>

</div>
Basically, the following codes have helped to design the background of this login form and give a certain size to this login form. As I said before, Neumorphism design has been used in this form. CSS programming code has been used to enhance this design.
@import url('https://fonts.googleapis.com/css?family=Josefin+Sans');
 *{
     margin: 0;
     padding: 0;
     box-sizing: border-box;
     outline: none;
     list-style: none;
     text-decoration: none;
     font-family: 'Josefin Sans', sans-serif;
}
 body{
     background: #dde1e7;
}
 .wrapper{
     max-width: 400px;
     width: 100%;
     height: 420px;
     position: absolute;
     top: 50%;
     left:50%;
     transform: translate(-50%,-50%);
     background: #dde1e7;
     box-shadow: -3px -3px 7px #ffffff73, 2px 2px 5px rgba(94, 104, 121, 0.288);
}
 .container{
     padding: 35px 40px;
}

Step 2: Create a button to open the login and registration form
If you have seen the demo of the login form, you will understand that first of all I have used two buttons here. One button will open the login form and the other will open the registration form.
As you can see, when the login form opens, the registration form is hidden. When the registration form opens, the login form will be hidden. Two buttons have been used to control this thing which I have used to create the programming code below.
<div class="tabs">

   <ul>

      <li class="sign_in_li">Sign in</li>

      <li class="sign_up_li">Sign up</li>

   </ul>

</div>
The following CSS programming codes have helped to design the buttons above.
.wrapper .tabs ul{
     width: 100%;
     margin-bottom:30px;
     box-shadow: 2px 2px 5px #babecc, -5px -5px 10px #ffffff73;
     display: flex;
}
 .wrapper .tabs ul li{
     width: 50%;
     padding: 15px 0;
     text-align: center;
     font-size: 14px;
     color: #35c868;
     font-weight: bold;
     text-transform: uppercase;
     letter-spacing: 2px;
     cursor: pointer;
     position: relative;
     transition: all 0.5s ease;
}
 .wrapper .tabs ul li.active{
     background: #dde1e7;
     color: rgb(0, 0, 0);
     box-shadow: inset 2px 2px 5px #babecc, inset -5px -5px 10px #ffffff73;
}

Step 3: Create and design the login form
First of all, we will create a login form. To do this, first, copy the following HTML code and then add it to your HTML file. In the following structure, I have given where you will add any programming code.
<div class="sign_in">
             <!--Email & Password Input-->

             <!--Login Button-->
             <!--social Icon-->

</div>
1. Create a place to input emails and passwords
The following programming codes help to create a place to input the email ID and password in this login form.
<div class="input_field">
               <input type="text" placeholder="E-mail" class="input">

</div>

<div class="input_field">
               <input type="password" placeholder="Password" class="input">

</div>
The following codes are the CSS programming code that designed the input spaces.
.wrapper .input_field{
     margin-bottom: 25px;
}
 .wrapper .input_field .input{
     width: 100%;
     border: none;
     background: #dde1e7;
     color: black;
     font-family: sans-serif;
     box-shadow: inset 2px 2px 5px #babecc, inset -5px -5px 10px #ffffff73;
     font-size: 14px;
     padding: 17px;
     border-radius: 10px;
}

2. Create a login button in the login form
A nice login button has been used in this login form which has helped to create and design the following HTML and CSS programming code. I have added a hover effect to it, which means that when you click on the button, the button will go inwards.
<div class="btn"><a href="#">Sign in</a></div>
.wrapper .btn{
     margin-top: 30px;
     background: #dde1e7;
     box-shadow: 2px 2px 5px #babecc, -5px -5px 10px #ffffff73;
     padding: 12px;
     text-align: center;
     border-radius: 10px;
     text-transform: uppercase;
     letter-spacing: 3px;
     font-weight: bold;
}
 .wrapper .btn:hover{
     color: #3498db;
     box-shadow: inset 2px 2px 5px #babecc, inset -5px -5px 10px #ffffff73;
}
 .wrapper .btn a{
     color: rgb(0, 0, 0);
     display: block;
     font-size: 16px;
     font-family: sans-serif;
}

3. Add social media buttons
Below, I have added four buttons to social media. The following HTML and CSS programming codes have been used to create and design those buttons.
You can change these social icons as you need. Be sure to add the font awesome CDN link in the head section of your Html file to make the icons work.
<div class="icon-button">

               <span class="facebook"><i class="fa fa-facebook"></i></span>

               <span><i class="fa fa-youtube"></i></span>
               <span><i class="fa fa-twitter"></i></span>
               <span><i class="fa fa-google"></i></span>


</div>
.icon-button{
margin-top: 50px;
}
.icon-button span{
margin-left: 20px;
padding-left: 17px;
padding-right: 17px;
padding-top: 15px;
padding-bottom: 6px;
border-radius: 5px;
line-height: 30px;
background: #dde1e7;
box-shadow: 2px 2px 5px #babecc, -5px -5px 10px #ffffff73;
}
.icon-button span:hover{
color: #3498db;
box-shadow: inset 2px 2px 5px #babecc, inset -5px -5px 10px #ffffff73;
}
.icon-button span i{
font-size: 25px;
}

Step 4: Add jquery code to activate the two menu buttons above
So far we have only designed the login form. Now we will execute these two buttons in this login form which we made at the top. As I said before when you click on the login button in the buttons above, the login form will appear and if you click on the registration button, the registration form will appear.
I used the Jquery programming code to make this thing work. If you know Basic Jquery then you must understand the programming code below.
$('.sign_up').hide();
$('.sign_in_li').addClass('active');

$('.sign_up_li').click(function () {
  $(this).addClass('active');
  $('.sign_in_li').removeClass('active');
  $('.sign_up').show();
  $('.sign_in').hide();
});

$('.sign_in_li').click(function () {
  $(this).addClass('active');
  $('.sign_up_li').removeClass('active');
  $('.sign_in').show();
  $('.sign_up').hide();
});

Step 5: Create and design the registration form
So far we have designed the login form, now I will design my registration form. For that, you copy the structure of the registration form below and add it to the Html file.
<div class="sign_up">
             <!--Username, Email,Password-->
             <!--Login Button-->

</div>
1. Create a place to input usernames, emails, passwords
In this case, I have used three types of options for registration. Here we have created a place to input username, e-mail id, and password. Here again, we have used a button to register.
<div class="input_field">
           <input type="text" placeholder="Username" class="input">

</div>

<div class="input_field">
           <input type="text" placeholder="E-mail" class="input">

</div>

<div class="input_field">
           <input type="password" placeholder="Password" class="input">

</div>
2. Add a registration button
<div class="btn"><a href="#">Sign up</a></div>

Hopefully from this article, you have learned how to create a login and registration form using HTML CSS and JQuery programming code.
In case many beginners may not understand the jQuery programming code, you can definitely let me know in the comments where you are having trouble. I will definitely help you.