3d Image Slider with Carousel using HTML CSS

3d Image Slider with Carousel using HTML & CSS

In this article, you will learn how to create 3d Image Slider using only HTML and CSS. In the case of ordinary image sliders, we use JavaScript or JQuery to change the image.

 However, you can create this type of 3D animated slider only with HTML and CSS without JavaScript.

3d Image Slider with Carousel using HTML & CSS

3d Image Slider is a modern image gallery that helps to organize many images beautifully. It enhances the beauty of the website as well as enhances user satisfaction a lot.

If you have knowledge of basic HTML and CSS then you can easily create a 3D Carousel slider by watching this tutorial.

What is Pure CSS 3d Image Slider?

There is no specific definition of 3D image sliders but there are certain types which we call 3D image sliders. Basically in this case the sliders can rotate up to 360deg along the z-axis.

In the meantime, I have made a design that uses 3D cubes. The most notable point in this design is that I did not use any JavaScript here and there is a Carousel to change the image.

This carousel helps to change the image and understand which image is open. Below I have given a live demo of it which will help you to know how this pure CSS 3d Image Slider works.

See the Pen
3d image slider with only html and css
by Raj Template (@RajTemplate)
on CodePen.

Hopefully, the demo above has helped you to know how it works.

3d Image Slider using HTML and CSS 

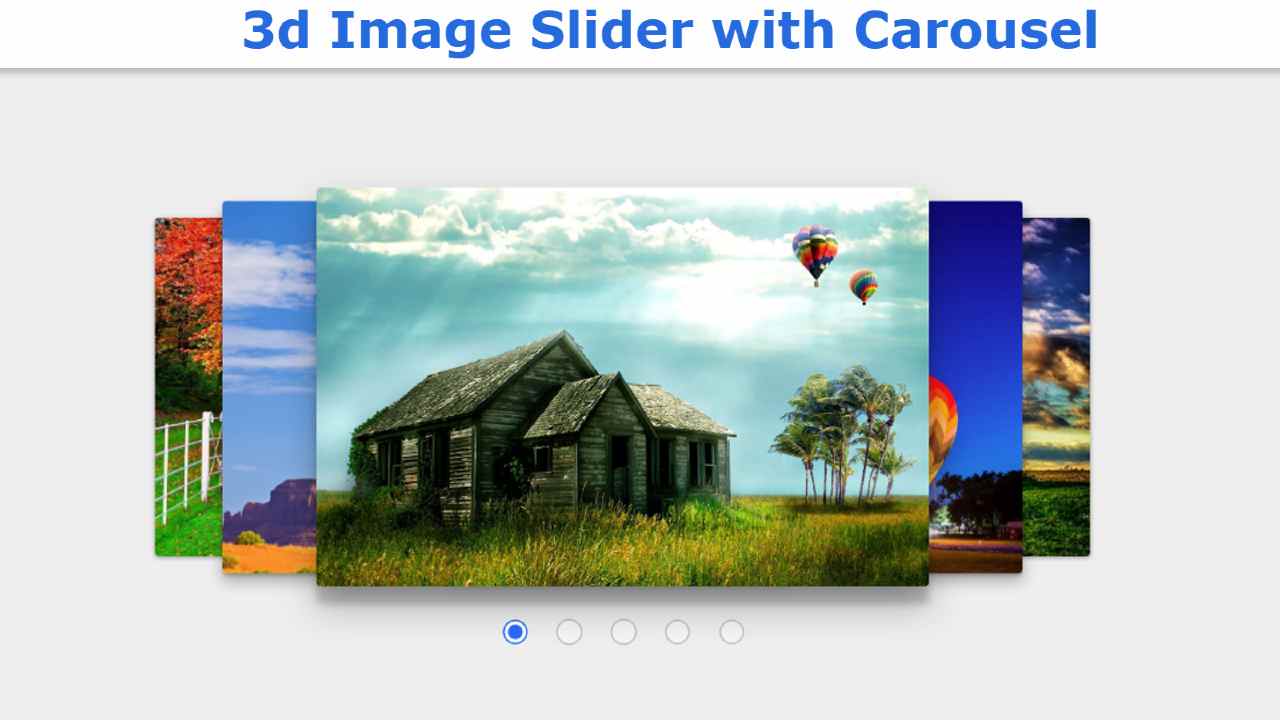
Below I have shared the complete tutorial for creating this 3D image slider. Let me tell you something about this design first. Here I have used five images. These images are beautifully arranged on the webpage. 

Here, out of 5 images, one image is complete and the other half is visible. Now is the time to get to know this tutorial completely.

Step 1: Design the web page

I designed the webpage using the CSS code below.

body {
  margin: 0;
  background: #EEE;
  user-select: none;
  font-family: sans-serif;
}
Design the web page

Step 2: Create the basic structure of the Image Slider

Now I have created a basic structure of the image slider. Slide height: 32vw and width 50%. I used transform-style: preserve-3d to make it 3d.

<section id=”slider”>
 
</section>
#slider {
  position: relative;
  width: 50%;
  height: 32vw;
  margin: 150px auto;
  font-family: ‘Helvetica Neue’, sans-serif;
  perspective: 1400px;
  transform-style: preserve-3d;
}

Step 3: Create a carousel in the slider

Now I have created five radio buttons for five images. As I said before, there is a carousel to change the images. I am using the radio button to make those carousels.

  <input type=”radio” name=”slider” id=”s1″ checked>
  <input type=”radio” name=”slider” id=”s2″>
  <input type=”radio” name=”slider” id=”s3″>
  <input type=”radio” name=”slider” id=”s4″>
  <input type=”radio” name=”slider” id=”s5″>
input[type=radio] {
  position: relative;
  top: 108%;
  left: 50%;
  width: 18px;
  height: 18px;
  margin: 0 15px 0 0;
  opacity: 0.4;
  transform: translateX(-83px);
  cursor: pointer;
}
input[type=radio]:nth-child(5) {
  margin-right: 0px;
}
input[type=radio]:checked {
  opacity: 1;
}
Create a carousel in the slider

Step 4: Add images to 3d Image Slider 

Now I just added the images to the slider. If you notice, you will understand that I have used an id in every image here. This will serve as the identity of the for and id images.

  <label for=”s1″ id=”slide1″><img src=”img1.jpg” alt=””></label>
  <label for=”s2″ id=”slide2″><img src=”img2.jpg” alt=””></label>
  <label for=”s3″ id=”slide3″><img src=”img3.jpg” alt=””></label>
  <label for=”s4″ id=”slide4″><img src=”img4.jpg” alt=””></label>
  <label for=”s5″ id=”slide5″><img src=”img5.jpg” alt=””></label>
#slider label,
#slider label img {
  position: absolute;
  width: 100%;
  height: 100%;
  left: 0;
  top: 0;
  color: white;
  font-size: 70px;
  font-weight: bold;
  border-radius: 3px;
  cursor: pointer;
  display: flex;
  align-items: center;
  justify-content: center;
  transition: transform 400ms ease;
}
Add images to 3d Image Slider

Step 5: Convert slider to 3D using CSS

I have implemented the image change using the following CSS code and arranged the images in 3d format.

For center image:

#s1:checked ~ #slide1,
 #s2:checked ~ #slide2,
  #s3:checked ~ #slide3,
   #s4:checked ~ #slide4,
    #s5:checked ~ #slide5 {
  box-shadow: 0 13px 26px rgba(0,0,0, 0.3), 0 12px 6px rgba(0,0,0, 0.2);
  transform: translate3d(0%, 0, 0px);
}

For next image 1:

#s1:checked ~ #slide2,
 #s2:checked ~ #slide3,
  #s3:checked ~ #slide4,
   #s4:checked ~ #slide5,
    #s5:checked ~ #slide1 {
  box-shadow: 0 6px 10px rgba(0,0,0, 0.3), 0 2px 2px rgba(0,0,0, 0.2);
  transform: translate3d(20%, 0, -100px);
}
3d Image Slider

For next image 2:

#s1:checked ~ #slide3,
 #s2:checked ~ #slide4,
  #s3:checked ~ #slide5,
   #s4:checked ~ #slide1,
    #s5:checked ~ #slide2 {
  box-shadow: 0 1px 4px rgba(0,0,0, 0.4);
  transform: translate3d(40%, 0, -250px);
}
Image Slider with Carousel

For prev image 1:

#s1:checked ~ #slide5,
 #s2:checked ~ #slide1,
  #s3:checked ~ #slide2,
   #s4:checked ~ #slide3,
    #s5:checked ~ #slide4 {
  box-shadow: 0 6px 10px rgba(0,0,0, 0.3), 0 2px 2px rgba(0,0,0, 0.2);
  transform: translate3d(-20%, 0, -100px);
}
Slider with Carousel using HTML & CSS

For Prev image 2:

#s1:checked ~ #slide4,
 #s2:checked ~ #slide5,
  #s3:checked ~ #slide1,
   #s4:checked ~ #slide2,
    #s5:checked ~ #slide3 {
  box-shadow: 0 1px 4px rgba(0,0,0, 0.4);
  transform: translate3d(-40%, 0, -250px);
}
3D Image Slider using HTML, CSS

Hope you have the tutorial above, you know how I made this 3d Image Slider with Carousel. If there is any difficulty then you can definitely let me know by commenting.