The transparent login form is a beautiful login design whose background is completely transparent. In this article, I am going to show you how to create a transparent login form using HTML and CSS.
This kind of transparent login design is much more beautiful and attractive than the general design. Here I will show you how to convert a simple design to a transparent login form Html.

If you know basic HTML and CSS then you can easily understand this design. With this, I have shown how to create a Responsive transparent login form and a transparent login form with blur background.
Transparent Login Form
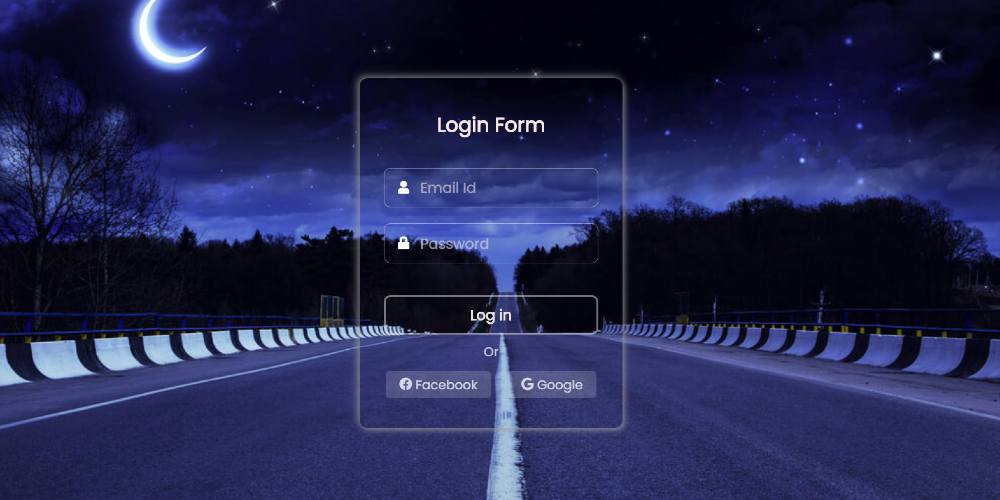
A transparent login form is a login design with a completely transparent background. In other words, we can clearly see the image or color used in the background.
Like the normal login form, it has everything like email id and password input space, a login button for login, and some social media icons.
codepen preview:
See the Pen
Untitled by Shantanu Jana (@shantanu-jana)
on CodePen.
There is only one difference between ordinary and it. The color is used in the background of the normal login form, but no color is used here, meaning it is completely transparent.
First I designed the webpage using a beautiful background image. Then I created a login form. Here I have used box-shadow to determine the size of the element. I am the first to use a title in the login form. Then I created two input boxes for input. Then there is a login button and two social media icons.
If you are a beginner and want to know how to create this program (Amazing Transparent Login Form) then follow the tutorial below. Below the article, I have given the source code so that you can download the source code to make this design.
Step 1:
Design the web page to create a transparent login form
I first designed the webpage to create a transparent login form. Here I have designed the web page and used a beautiful image in the webpage.
You can use any image here if you want. Background height I used 600px and used the image as a cover image of the background.

Step 2:
The basic structure of the login form
Now I have created the basic structure of this design using the following HTML and CSS code. This transparent login form has no height. It basically depends on the amount of content you have.
I have used 350 px width of this design. I used box-shadow to determine the size of this form. The box-shadow helped create a shadow around this element.

Step 3:
Add a title to Transparent Login Form
Now I have created a place to input in the transparent login form. Here you can use any text such as the name of your brand or website.
Font-size: 25px has been used to increase the text size used here. font-weight: 600 helped to make the text a bit bolder. I also helped the margin-bottom to create some space under the text.

Step 4:
Create an input place in the Transparent Login Template
Now I have created two input boxes to input into this transparent login form Html. For this, the input function of HTML has been used. The first input box is for typing text or email ID. The second input box is for inputting the password.
An icon has been used in place of each input. To make these icons work, you must add a font awesome CDN link to your HTML file. The width of the input space is 100% and the height is 50 px.
I have designed the placeholders and icons using the following CSS code. You must have noticed that I used a placeholder instead of an input, i.e. a default text that can be found in the input space. I added a little gap using field: nth-child (2) to keep a little distance between the two input spaces.

Step 5:
Create a login button within the login form
Now we have created a nice login button in this transparent login form which will help to log in. First I made a nice login button using button tags. Then with the help of CSS code, I designed the login button.
The height of the button is 50 px and border-radius: 8px has been used to make it slightly round.

Step 6:
Create social media buttons
I have added a social media button to the transparent login form. If you have seen the demo, you will understand that two social media icons have been used here. I first created those icons using HTML code. Then I designed it nicely with CSS code.
Padding has been used to give the icons the shape of a button. Border-radius has been used to make this button slightly rounded.

Step 7:
Responsive Transparent Login Form
Now you will know how to create a Responsive Transparent Login Form using HTML CSS. You need to add some CSS code to make it responsive. Now you need to use CSS code @media to make it responsive.
First I gave a maximum width using @media. Then I reduced the size of all the elements like the login form, heading, input space, and login button.
For example, the width of this login form was 330 px in normal conditions but now I have given its length as 260 px. Thus I have changed the size of each element.

Step 8:
Transparent Login Form with Blur Background
Creating a transparent login form with blur background is very easy. For this, you need to make some special changes to the CSS code. You can transform any simple login form design into a blurred background using just two lines of programming code.
Here I have used background color and backdrop filter. Added a white transparent background color using the background color.
I used a backdrop filter to blur the background. Here I have given a specific value of blur. If you want to increase the value of this blur, you can increase its value to 10.

Hopefully from the tutorial above you have learned how to create a transparent login form and make it blur and responsive.
In the meantime, I have shared tutorials on many more designs such as login forms, calculators, JavaScript clocks, etc. If you want to get the source code of this transparent login from HTML CSS then use the download button below.