In this article, you will learn how to create Our Team Section Design using HTML and CSS. Earlier I created Responsive Team Section using Bootstrap.
Currently, this type of design is used in different personal, business websites. This enhances the quality of the website as well as user satisfaction. Using this type of our team HTML CSS, you can beautifully arrange the basic information of the members of your company or group with pictures.
I have added a hover effect in this design which will catch your attention. Creative Our Team Section Design I took with the help of HTML and CSS. Below I have given a demo that will help you to know how this CSS team page works.
See the Pen
Our Team Section with Hover Effect by Raj Template (@RajTemplate)
on CodePen.
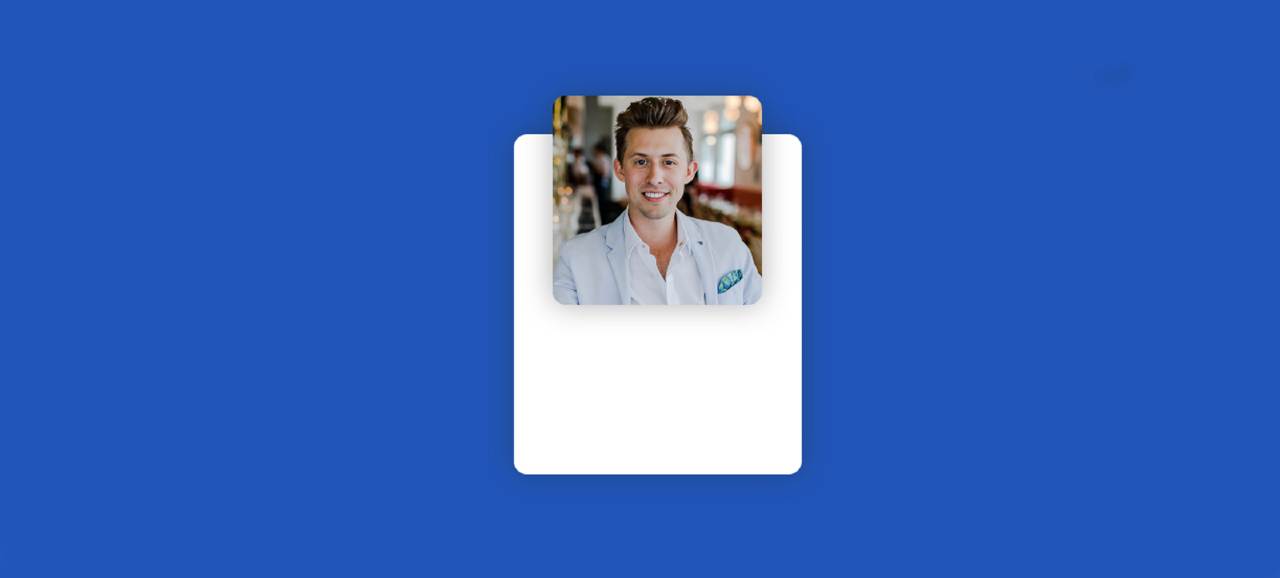
First I designed the webpage then placed the three images here in a circular motion at a certain distance. I have used the border radius of CSS code to make the images round.
Under normal circumstances, only images can be seen. Whenever you click on that round image, the images will go up and the rest of the information will be seen below. In addition, the image will be round to rectangular in shape. For information here I have used names, some basic descriptions, and three social media icons.
Our Team Section using HTML and CSS
Follow your full tutorial if you want to know how to create a Creative Our Team Section. HTML code helps to add basic information and images. Then with the help of CSS code, I designed it completely. However, it is not responsive. You can already see my other designs if you want to be responsive.
You need to have an idea about basic HTML and CSS to create this project. If you want the source code, use the download button at the bottom of the article.
Step 1: Create the basic structure of Team Section
Using the HTML and CSS code below I have created the basic structure of the team section in this response. First I designed the webpage a bit and created a round background of profile cards. The width and height of this background are 220px and the background color is white.

I have added a hover effect to this box using below CSS code. Whenever you move or click the mouse on this round box, the box will take on a rectangular shape and the height will be 260 px.

Step 2: Add a profile image in the box
Now I have added an image to this background. HTML’s image tags helped to add the image. Then I designed that image with the help of CSS code.

With the help of CSS below, I have added a hover effect on the images. Whenever you click on this image or move the mouse, the image will move up to 80px. For this, I have used transform: translateY (-60px) which will help to change something along the y-axis.
Step 3: Add a description to our team design
In the description, I have added basic information i.e. some text. Under normal conditions, it will be hidden because the image will be on it. When the mouse is moved over it, the images will move upwards and then the information will be visible.

Step 4: Add social icons to the Responsive Team Section
I added social media icons to the profile card. Here I have added three social media icons so you can increase the amount if you want. If you increase the number of icons on social media then you need to make some special changes in the CSS code. Add the font awesome CDN link to your HTML file to make the icons work.

Step 5: Add more designs to make our team HTML CSS
Now is the time to add more profile designs like the ones above. Here I have used three designs. So now I have added two other cards. No need to add a separate CSS code here. It will work on the same CSS code. Something has changed here, such as images and text.

As you can see in the picture above, now this Responsive Our Team Section is designed to enhance the beauty and quality of your website. If you know how I made it from this tutorial, Please share it.
In the meantime, I have shown the design of many more Responsive Our Team using Bootstrap. If you want to get this kind of tutorial, you can follow me on Instagram(@foolishdeveloper).