You can learn how to make automatic and manual image sliders from this tutorial. Earlier I showed you how to create two types of image sliders, manual and automatic. However, in this tutorial, you will learn how to create automatic and manual image sliders together.
You can manually change the images in this image slider and the slider can automatically change the images. Most importantly, I used very little JavaScript here. This means that even if you do not know JavaScript, you can easily create this automatic and manual image slider using HTML and CSS.
We all know how important an image slider is for a website. This type of slider is used on the homepage of different websites. This type of Automatic and Manual Image Slider is also used in different types of image galleries. This type of slider also plays a very important role in different types of image download websites or business websites.
Automatic and Manual Image Slider in HTML CSS
This type of design (Automatic and Manual Image Slider in HTML CSS) is very useful in websites where a lot of images need to be arranged neatly. Here I have shared the necessary source code which you can copy and use in your own work.
If you are a beginner then I have already shared many more such design tutorials for you. You can follow those designs to know the tutorial.
See the Pen
Untitled by Foolish Developer (@foolishdevweb)
on CodePen.
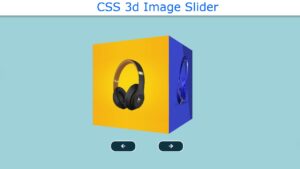
First, the webpage was designed then I made a box. All the images can be seen in this box. These images will change automatically every five seconds. Although you can change the time of this image change. Indicators have been used in the slider. This indicator image can be changed and the number of open images can be understood.
Here I have used four images so I have used four indicators. If you click on the first indicator, you will see the first image and if you click on the third indicator, you will see the third image.
This way you can change the image manually. The slider will also be able to automatically change the image every five seconds.
Hope the above demo has helped you to know how to create this Simple Automatic and Manual Image Slider. To make it, you must have a basic idea about HTML and CSS. If you are a beginner then you can see my other image slider designs. Which will give you the basic idea of creating an image slider.
1. HTML of Automatic and Manual Image Slider
First, you create an HTML and CSS file. Then add the following source code to the file. The following HTML code is used to create the basic structure of the slider. Here I have used the input function to manually change the image and I have used four images with it.
As I said before, there are separate radio buttons for each image. Since I’ve used four here, I’ve used four radio buttons. If you increase the size of the image, you need to increase the amount of the radio button. You copy below HTML code then add it to your HTML file. Of course, in this case, attach the CSS file to the HTML file.
2. Design Image Slider with CSS
Now is the time to design an Automatic and Manual Image Slider. The following CSS code has been used for this purpose. You copy your CSS and add it to your HTML file.
Here first I designed the background of the slider and then the indicator. Slider width: 600px, height: 350px and box-shadow has been used to enhance the beauty.
3. Arrange to change the images automatically
Now is the time to implement automatic image conversion with JavaScript. However, if you want, you can change the image automatically using only HTML CSS. I have already shared a tutorial on how to create an automatic image slider using HTML and CSS.
But here I have taken the help of JavaScript to make the work easier. Here I have used all the calculations in setInterval. setInterval is a JavaScript function that allows you to update calculation information periodically.
Here 5000 milliseconds have been used which means these calculations will be updated every five seconds. As a result, every five seconds we can notice a change in the image. Here the radio button will change with the change of image. In other words, the radio button that will open the image will be highlighted.
Hopefully from this tutorial, you have learned how to create Automatic and Manual Image Slider using HTML and CSS. I have shared many more manual and automatic image slider designs with you before.
If there is any problem, you can definitely comment. You can download the source code required to create this project with the help of the button below.